
Safety Rules for Wood Studios
General Rules
- All students are required to read, discuss and ask any questions they might have about the VAM Safety Manual and after so doing, sign the Safety Manual Consent Form (see Forms) .
- The Wood Program welcomes students from all disciplines into the Wood Studios. However, no one is allowed to use the Wood Studio or the equipment in it without first obtaining permission from the Wood Program Instructors. The program instructors will establish a list of students who are qualified to work in the Wood Studio. All other students may only work in the Wood Studio when their class is in session and the instructor is present, or when, by appointment, an instructor or monitor is available to supervise them. Anyone who has not been certified by the program instructors must check in with and request the supervision of an instructor or monitor before beginning work in the Wood Studio.
- No one, including faculty, may operate machinery in the Wood Studio, regardless of the time of day, unless at least one other adult is present somewhere in the Wood Studio and has been notified that machine work will be in progress.
- Use the woodworking facility only when alert, rested and focused. To do otherwise is to expose yourself and others to risk. Under no circumstances attempt to use machinery when your judgment is impaired or you are ill, under the effects of medication, drugs or alcohol, or sleep deprivation. No smoking or eating is allowed in the Wood Studio.
- Prepare yourself for the use of machinery by securing your clothing, hair and jewelry. Also outfit yourself with appropriate hearing protection, gloves, goggles and personal protective equipment. See to it that all necessary aids, such as push sticks, saw horses, hold-downs, guide fences, or someone to help are within reach or their proper place. ALL GUARDS MUST BE USED. Safety eyeglasses or goggles should also be worn when doing some bench work such as chipping or cutting wood, or when working with materials corrosive to eyes such as solvents, varnishes, or hardeners. (See Ear & Eye Protection) .
- Dust collection and ventilation systems have been provided for your protection. You must engage these systems when working on projects. Inhaling foreign substances is one of the biggest health hazards in the woodwork shop. Be sure you have adequate ventilation for either dust or fumes before proceeding with a project. (See article "Dust & The Woodworker" farther on in this section)
- Approach any woodworking machine, hand-held or stationary, with respect, which begins with a thorough examination of the equipment before using it.
- Keep your attention focused on both the machine and on the operation you wish to perform with it.
- Never distract or talk to someone who is operating a machine, or allow them to distract or talk to you while you are in the process of using equipment. If you must pass by someone using equipment, approach them head-on so they may see you coming and not be startled.
- Be alert for any unusual sounds, loose parts, dull blades, poor adjustments, when turning on or operating a machine. Correct the situation before continuing to use the machine. Never force a machine to do work. Report any electrical or mechanical hazards immediately.
- Clean up scrap wood, sawdust when finished with an operation. Return the machine to a state of readiness for the next person to use. Also return all hand-held machines to their proper storage area.
- If you have any question about the use or operation of a machine, ask for assistance before going ahead with your work.
- A general housekeeping schedule will be posted at the beginning of each semester. All students must assume responsibility in this important matter. Sawdust generated by both machines and handwork is a health and fire hazard and should be cleaned up daily.
- All flammables and hazardous solvents must be used in a well-ventilated area. They must be stored in the facilities provided in the Sculpture Studios. Solvent soaked rags should be placed in an approved, self-closing waste disposal can which is emptied on a regular basis.
- The ebonizing process involves the use of several toxic chemicals: Aniline and a solvent mixture containing aromatic hydrocarbons (Toluol). Adequate ventilation and protection for hands and face (gloves, safety goggles and personal protective equipment) must be used in this process.
- Students must familiarize themselves with the wood and other materials they are using and take suitable precautions. Stripping, painting and finishing, for example involve a wide variety of solvents which must be treated with respect. The solvent benzene, for example, is a known carcinogen and may not be used in any form.
- Many skin conditions and allergies can be caused by wood glues and adhesives such as epoxy and phenol-formaldehyde-resin glues. Glues and cements which contain solvents can dry and defat the skin making it more subject to infection. Safe use of the more hazardous adhesives (which might contain, for example, hexane, naptha, mineral spirits and methyl chloroform) requires avoiding skin contact, sparing and careful use, keeping containers closed as much as possible during application and good general shop ventilation. Water-based contact adhesives, casein glues, hide glues, white glue (polyvinyl acetate) and other water-based adhesives are slightly toxic through skin contact. Dry casein glues are highly toxic by inhalation or ingestion and moderately toxic by skin contact since they often contain large amounts of sodium fluoride and strong alkali. (See article "Chemical Hazards of Woodworking" farther on in this section)
- Vibrating tools can with extended use cause health problems. Get instruction in the proper use of such tools.
- Certain woods, especially those of an exotic nature and/or wood treated with pesticides, may be irritants or cause allergic responses. Students should be aware of these potential hazards and seek information from their instructors. (See article "Health Hazards in Woodworking" farther on in this section).
- A Fire and Emergency list of telephone numbers and procedures is posted in the Wood Studio (see Forms). Instructors should be consulted in the event of any mishap. All accidents, large or small, must be reported immediately to the instructor or person in charge.
- First Aid equipment has been provided. Sculpture Instructors are responsible for keeping it replenished. Call 956-872-2503, for information or assistance regarding First Aid.
- Should symptoms of a health problem or illness appear and persist, report the matter to your instructor.
FOR VIOLATIONS OF SAFETY PROCEDURES
The Wood Program expects that all students will abide by the safety and health procedures outlined in this manual. Major and minor infractions will be addressed immediately and such violations will become part of the student's record (see Forms).
The instructor shall:
- Identify the nature of the violation to the student.
- Inform the student of the correct procedure and observe the student performing the procedure in a proper manner.
- A violation may result in a student's not being allowed to engage in a specific procedure unless supervised.
- The Violation Form shall be signed and dated by both the instructor and the student and placed in the student's file. A copy shall be given to the student.
Repeated violations will bring into question whether the student involved will be allowed to finish the course. The department involved will meet with the student and make a recommendation.
Safety Regulations for Specific Equipment in the Wood Studio
Table Saw
- Students are NOT allowed to use the table saw. Only Instructors are allowed to use the table saw.
- It is the responsibility of those using the table saw to first determine if this machine is the safest way to accomplish the desired task.
- Always wear safety goggles, hearing protection and use the dust collection system. Also, do not wear loose or dangling clothing and jewelry.
- Clean the table of the machine and the floor around the saw before beginning work and then again when you are finished.
- Position the saw guard, splitter and anti-kickback device before turning the saw on. (See article "Brett-Guard Table Saw - Operation" farther on in this section). Always lock out power before changing the saw guard or servicing the machine in any way.
- Use only new stock that is free of dirt, paint, nails, loose knots, splits and warps. Also, attempting to rip short, narrow or thin wood invites trouble.
- Stock should be surfaced on one side and at least one edge jointed before being cut on the saw.
- Make sure that any necessary aids such as a push stick, push blocks, or rollers to catch outgoing wood are ready before beginning an operation. If a person is going to help you cut a large piece of stock, be sure they only support the stock and do not attempt to push or pull it. YOU, the operator, must control the feed and direction of the cut.
- Be certain the blade to be used is sharp and the proper type for the operation.
- Adjust the height of the blade to no more than one-eighth inch above the stock to be cut.
- Stand to one side of the blade and never reach across, behind or beyond the blade while cutting. Again, your hands should never be IN LINE with the cutting blade. Maintain a four-inch margin of safety: do not let your hands come closer than four inches from the blade. USE the push stick.
- Be sure no one is standing in a direct line behind the saw.
- Always use either the rip fence or the miter gauge when cutting. NEVER CUT STOCK FREEHAND. When setting the rip fence, make sure that the fence locks parallel to the blade. Otherwise the wood can bind and kick back. Never use the miter gauge in combination with the rip fence unless a clearance block is used. Never try to support both pieces on opposing sides of the saw blade when using the miter gauge; support the portion positioned against the gauge side only. When ripping, always support the portion of your piece that is in between the rip fence and the blade.
- If you tilt the blade or change the miter gauge, return them to their original position after using the saw. When changing blades always be sure that the washer and lock-nut are tight to the blade.
- When making a cut, make sure you pass the stock completely past the blade as you finish your cut. NEVER BACK UP STOCK ONCE YOU HAVE PROCEEDED WITH A CUT. If need be, stop and shut the machine down. Always turn the saw off before attempting to remove scrap.
- Never talk to anyone or let them distract you while the saw is running. Keep your attention focused on your work.
The Bandsaw
- Always wear safety goggles, hearing protection and use the dust collection system. Secure all loose clothing, hair and hanging jewelry.
- Clean the table and the area around the bandsaw before beginning work and when you are finished.
- Saw only stock which is free of dirt, paint, nails, splits, warps and loose knots.
- Make all adjustments to the machine before turning it on. Never open the wheel enclosure doors while the machine is in operation. Adjust the upper guide post so that it is no more than 1/4 inch above the work.
- If the blade is not tracking properly or needs adjustment stop the machine and see the instructor. Do not use a dull blade.
- Be extremely cautious of the exposed blade. Keep fingers clear. Never allow your hands or fingers to be IN LINE with the blade. Make sure your fingers are out of the way as you near the end of a cut.
- Avoid backing out of saw cuts. You could pull the blade off the wheel.
- If a blade breaks, step back quickly, turn off the saw, report to the instructor.
- Clean up.
12" Compound Miter Saw
- ALWAYS WAIT UNTIL THE BLADE HAS COME TO A COMPLETE STOP BEFORE LIFTING THE SAW HANDLE. Start blade rotation, cut material, stop blade rotation, lift.
- NEVER LEAVE TOOL RUNNING UNATTENDED. TURN POWER OFF. Don't leave tool until it comes to a complete stop.
- DO NOT OPERATE ELECTRIC TOOLS NEAR FLAMMABLE LIQUIDS OR IN GASEOUS OR EXPLOSIVE ATMOSPHERES. Motors in these tools may spark and ignite fumes.
- EXTENSION CORDS. Make sure your extension cord is in good condition. When using an extension cord, be sure to use one heavy enough to carry the current your product will draw. An undersized cord will cause a drop in line voltage resulting in loss of power and overheating. The following table shows the correct size to use depending on cord length and nameplate ampere rating. If in doubt, use the next heavier gage. The smaller the gage number, the heavier the cord.
| Volts | Total Length of Cord in Feet | |||
|---|---|---|---|---|
| 120V | 0-25 | 26-50 | 51-100 | 101-150 |
| 240V | 0-50 | 51-100 | 101-200 | 201-300 |
| More Than | Not more Than | AWG | ||||
|---|---|---|---|---|---|---|
| 0 | - | 6 | 18 | 16 | 16 | 14 |
| 6 | - | 10 | 18 | 16 | 14 | 12 |
| 10 | - | 12 | 16 | 16 | 14 | 12 |
| 12 | - | 16 | 14 | 12 | Not Recommended | |
Safety Rules For Miter Saws:
- CAUTION: FAILURE TO HEED THESE WARNINGS MAY RESULT IN PERSONAL INJURY AND SERIOUS DAMAGE TO THE SAW.
- DO-Protect electric supply line with at least a 15 ampere time-delay fuse or a circuit breaker.
- DO-Make certain the blade rotates in the correct direction and that the teeth at the bottom of the blade are pointing to the rear of the miter saw.
- DO-Be sure all clamp handles are tight before starting any operation.
- DO-Be sure all blade and clamp washers are clean and recessed sides of collars are against blade. Tighten arbor screw securely.
- DO- Keep saw blade sharp and properly set.
- DO-Keep motor air slots free of chips and dirt.
- DO-Use blade guards at all times.
- DO-Keep hands out of path of saw blade.
- DO-Shut off power, disconnect cord from power source and wait for saw blade to stop before servicing or adjusting tool.
- DO-Support long work with an outboard tool rest.
- DON'T-Attempt to operate on anything but designated voltage.
- DON'T-Operate unless all clamp handles are tight.
- DON'T- Use blades larger or smaller than those which are recommended.
- DON'T- Wedge anything against fan to hold motor shaft.
- DON'T-Force cutting action. (Stalling or partial stalling of motor can cause major damage. Allow motor to reach full speed before cutting.)
- DON'T- Cut ferrous metals (Those with any iron or steel content) or any masonry.
- DON'T-Use abrasive wheels. The excessive heat and abrasive particles generated by them will damage the saw.
- DON'T-Allow anyone to stand behind saw.
- DON'T-Apply lubricants to the blade when it's running.
- DON'T-Place either hand in the blade area when the saw is connected to the power source.
- DON'T-Use blades rated less than 4600 R.P.M.
- DON'T-Attempt to cut small pieces (6") without clamping.
- DON'T-Operate saw without guards in place.
- DON'T-Perform any operation freehand.
- DON'T-Reach around or behind saw blade.
- DON'T-Place hands closer than 6 inches from the saw blade.
- DO NOT - Reach underneath the saw unless it is turned off and unplugged. The saw blade is exposed on the underside of the saw.
- DO NOT - Move either hand from saw or workpiece or raise arm until blade has stopped.
- DO NOT - Use without Keff Plate or when kerf slot is wider than 3/8".
CAUTION: Do not connect unit to electrical power source until complete instructions are read and understood.
For your convenience and safety, the following warning labels are on your miter saw.
ON MOTOR HOUSING:
WARNING: FOR YOUR OWN SAFETY, READ INSTRUCTION MANUAL BEFORE OPERATING SAW. WHEN SERVICING, USE ONLY IDENTICAL REPLACEMENT PARTS. ALWAYS WEAR EYE PROTECTION.
ON MOVING FENCE:
ALWAYS ADJUST FENCE PROPERLY BEFORE USE. CLAMP SMALL PIECES BEFORE CUTTING. SEE MANUAL.
ON GUARD:
ALWAYS ADJUST FENCE PROPERLY BEFORE USE. CLAMP SMALL PIECES BEFORE CUTTING. SEE MANUAL. DANGER - KEEP AWAY FROM BLADE. ON TABLE: (2 PLACES)
ALWAYS TIGHTEN ADJUSTMENT KNOBS BEFORE USE. KEEP HANDS 6" FROM PATH OF SAW BLADE. NEVER PERFORM ANY OPERATION FREEHAND. NEVER CROSS ARMS IN FRONT OF BLADE. THINK! YOU CAN PREVENT ACCIDENTS.
DO NOT OPERATE SAW WITHOUT GUARDS IN PLACE. NEVER REACH IN BACK OF SAW BLADE. ALWAYS WEAR EYE PROTECTION. SHUT OFF POWER AND WAIT FOR BLADE TO STOP BEFORE SERVICING, ADJUSTING TOOL, OR MOVING HANDS.
Important Safety Instructions:
WARNING: When using electric tools, basic safety precautions should always be followed to reduce risk of fire, electric shock and personal injury, including the following:
READ ALL INSTRUCTIONS
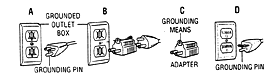
Grounding Instructions:
This tool should be grounded while in use to protect the operator from electric shock. The tool is equipped with a 3-conductor cord and 3-prong grounding type plug to fit the proper grounding type receptacle. The green (or green and yellow) conductor in the cord is the grounding wire. Never connect the green (or green and yellow) wire to a live terminal. If your unit is intended for use on less than 150 V, it has a plug that looks like that shown in sketch A. If it is for use on 150 to 250 V, it has a plug that looks like that shown in sketch D. An adapter, sketches B and C, is available for connecting sketch A type plugs to 2-prong receptacles. The green-colored rigid ear, lug, or the like, extending from the adapter must be connected to a permanent ground, such as a properly grounded outlet box. No adapter is available for a plug as shown in sketch D. ADAPTER SHOWN IN FIGURES B and C IS NOT FOR USE IN CANADA. Use only 3-wire extension cords that have 3-prong grounding-type plugs and 3-pole receptacles that accept the tool's plug. Replace or repair damaged cords.
Safety Instructions For All Tools:
- KEEP GUARD IN PLACE and in working order.
- REMOVE ADJUSTING KEYS AND WRENCHES. Form habit of checking to see that keys and adjusting wrenches are removed from spindle before turning tool on.
- KEEP WORK AREA CLEAN. Cluttered areas and benches invite accidents.
- DON'T USE IN DANGEROUS ENVIRONMENT. Don't use power tools in damp or wet locations, or expose them to rain. Keep work area well lighted.
- KEEP CHILDREN AWAY. All visitors should be kept at a safe distance from work area.
- MAKE WORKSHOP KID PROOF with padlocks, master switches, or by removing starter keys.
- DON'T FORCE TOOL. It will do the job better and be safer at the rate for which it was designed.
- USE RIGHT TOOL. Don't force tool or attachment to do a job for which it was not designed.
- WEAR PROPER APPAREL. No loose clothing, gloves, neckties, rings, bracelets, or other jewelry to get caught in moving parts. Non-slip footwear is recommended. Wear protective hair covering to contain long hair.
- ALWAYS WEAR SAFETY GLASSES. Also use face or dust mask if cutting operation is dusty. Everyday eyeglasses have only impact resistant lenses, they are NOT safety glasses.
- SECURE WORK Use clamps or vise to hold work when practical. It's safer than using your hand and it frees both hands to operate tool.
- DON'T OVERREACH. Keep proper footing and balance at all times.
- MAINTAIN TOOLS WITH CARE. Keep tools sharp and clean for best and safest performance. Follow instructions for lubricating and changing accessories.
- DISCONNECT TOOLS before servicing; when changing accessories such as blades, bits, cutters, etc.
- REDUCE THE RISK OF UNINTENTIONAL STARTING. Make sure switch is in OFF position before plugging in.
- USE RECOMMENDED ACCESSORIES. Consult the instruction manual for recommended accessories. The use of improper accessories may cause risk of injury to persons.
- NEVER STAND ON TOOL. Serious injury could occur if the tool is tipped or if the cutting tool is unintentionally contacted.
- CHECK DAMAGED PARTS. Before further use of the tool, a guard or other part that is damaged should be carefully checked to determine that it will operate properly and perform its intended function-check for alignment of moving parts, binding of moving parts, breakage of parts, mounting and any other conditions that may affect its operation. A guard or other part that is damaged should be properly repaired or replaced. Do not use tool if switch does not turn it on and off.
OTHER WOOD STUDIO MACHINES AND TOOLS
The Wood Studio has many other machines, such as drill presses, grinding wheels, scroll saws and sanders, many hand-held power tools, such as the portable rotary saws, drills, routers, grinders and sanders, as well as many potentially dangerous hand tools such as chisels, saws, carving tools and knives.
- Students may not use any of these tools without instruction and instructor supervision.
- All of the Wood Studio general rules and procedures apply to these tools and machines.
Eye Safety
How to treat and prevent eye injuries
by Dr Paul F. Vinger
(Reprinted from the Sept./Oct., 1988 issue #72 of "Fine Woodworking" by the Taunton Press, Inc., 63 South Main St., Newtown, CT 06470. Not for Resale.)
Some woodworkers don't wear eye protection. I do. As an ophthalmologist, I've seen woodworkers who've been blinded, lost an eye or suffered for days after having even just a tiny wood sliver removed from an eye. Eyes are among the most vulnerable parts of the body: They are easily punctured, lacerated, perforated or chemically burned. They should be protected at all times in the shop. The eyelid offers protection from dust, but it is no match for the hazards woodworkers encounter every day. A chip, for example, can fly from a 10-in. table saw at 103 MPH. That's 2 ft. in 13/1,000 of a second. If the object hits your arm, it might sting or even cut it. The same chip could puncture your eye.
When I treat injured woodworkers, I often think the safety glasses, goggles and face shield hanging in my shop might just be among the best woodworking tools I own. These three kinds of eye protection will prevent almost any eye injury a woodworker is likely to encounter. Sometimes you only need to wear safety glasses; other times, especially if you've already suffered a serious eve injury, you need to wear two forms of eye protection.
Protection options - Each woodworker must decide what form of protection to wear, but here are some guidelines to follow. If you're using high-horsepower machinery, especially machines that rotate blades at high speeds and are capable of hurling large objects, it's wise to wear maximum eye protection. Machines that deliver less energy at slower speeds may call for less eye protection. For example, you might wear safety glasses or goggles plus a face shield when using a tablesaw, shaper or other tool where there is a danger of a large piece of wood being kicked back and damaging both the eyes and other parts of the face. I always recommend both safety glasses and a face shield for lathe work. Incidentally, protective eyeglasses or goggles should always be worn under face shields, because woodworkers frequently raise the shield to examine a workpiece or to provide ventilation, thus temporarily exposing their eyes to a potential injury. Safety glasses with side shields may be adequate when using drill presses: slow-speed, electric hand tools; or hammers and screwdrivers. Side shields should be worn with safety glasses, because the effectiveness of the safety glasses is reduced by 25% if the shields are removed. Goggles should be worn over street-wear (non-safety) glasses when there is a risk of many fine flying particles and for use with chemicals and for welding that doesn't require a full face shield. If you have any doubts, wear more eye protection than less.
Hand tools hurt eyes more often than power tools, so don't neglect safety glasses for even simple jobs. The Consumer Product Safety Commission has reported that 6,719 people suffered eye injuries in 1986 while working with hand tools at home. Most of those injuries came from hammers and screwdrivers. For example, one of my patients, a young carpenter, once hit a ten penny nail with a glancing blow. The nail rocketed from the wood into his left eye, destroying the eye's lens. The contact lens I gave him to replace his natural lens restored the vision in his eye, but he can no longer focus on close objects without bifocals.
Safety glasses are the first line of defense against eye injuries If you're a woodworking hobbyist, reaching for your safety glasses should be the first thing you do in any woodworking project. If you're a woodworking professional, think of yourself as a person who wears glasses most of the time. Put on your safety glasses before you enter the shop and don't take them off until you leave at the end of the day. If you wear vision-correcting glasses already, don't be fooled into thinking regular prescription glasses offer protection: They're not designed to withstand heavy impacts. Get a pair of prescription safety glasses with side shields from a quality eye-care professional. There's no excuse not to, given the wide variety of protective equipment available today. Even designer-style safety glasses have been available for some time now (see the sidebar on p. 72).
Years ago, safety glasses were made of just that-glass Today, virtually all nonprescription safety lenses are made of super tough polycarbonate and prescription safety glasses come with polycarbonate, glass or CR-39 plastic lenses. Tests show that a polycarbonate lens is at least five times stronger than a glass lens and more than twice as strong as a CR-39 plastic lens.
Sometimes even safety glasses or goggles are not enough to stop the power of a flying object. A face shield needs to be added. You may be thinking: "No one wears safety glasses and a face shield at the same time." But, this double protection is often advisable. I once treated a man who worked at the same shop for 30 years. He lost both eyes and severely fractured several bones in his face when a planer shot an oak board at him. The pliable sides of a good pair of safety goggles would have dissipated some of the power in that flying piece of lumber, but much of its damaging force would have been transferred to the bones surrounding the eye. Even so, the lenses of the safety glasses or goggles would. probably have prevented cuts and punctures to the eyeball. I have no doubt that wearing both safety glasses and a face shield would have lessened this man's injuries enough that his sight could have been saved and his disfigurement reduced or eliminated Remember, eye injuries are not predictable; they happen in an instant. Many woodworkers who ordinarily wear eye and face protection have paid dearly when the unexpected happened after the protective device was removed while doing "a little touch- up."
Chemicals and Irritants - Acids and alkalis such as those used in bleaches, stains and dyes can cause permanent blinding eye injuries. In sufficient strength, these chemicals can rapidly eat through the cornea and into the iris and lens (see the drawing on the facing page), damaging the eye beyond repair. It may surprise you that solvents like lacquer thinner, acetone and turpentine normally only cause topical damage to the eye and rarely cause sight-threatening injuries if they can be completely and quickly flushed from the eyes. Even so, many chemicals that woodworkers use can cause extreme pain if they-get in the eye Whenever you work with chemicals, wear goggles. The goggles should have hooded vents that allow ventilation but prevent liquids from getting into the eyes. If any chemical gets into an eye, treat it as a medical emergency (see the sidebar on the facing page). Thermal burns to the lids and eye from exposure to excess heat are rare among woodworkers. However, if you're going to be exposed to high-heat operations, heat-absorbing or reflecting protective eye wear is available.
I've seen more than one woodworking patient who's had bad experiences working with cyanoacrylate (instantly adhering) glue. They either walk into my office with an eyelid glued shut or a finger stuck fast to an upper or lower eyelid. Repair involves minor surgery. Goggles or safety glasses would probably have prevented the problem.
Contact lenses and woodworking don't mix, especially if you're working with acids or alkalies. If a chemical splashes in an eye, it gets trapped underneath the contact lens. It's hard enough to get a woodworker's eyelid open when acid or alkali is in the eye and the time needed to pluck out the contact lens just gives these chemicals more time to do their damage. Sawdust and other particles also constantly get under contact lenses, causing pain and scratches to the eye's cornea.
I suspect that every woodworker has had to remove sawdust from an eye from time to time. I've had to do it myself. Most woodworkers know that flushing the eye with water will remove most particles and many know the old trick of pulling an upper eyelid over a lower one to remove a speck of sawdust. What many woodworkers fail to do, however, is brush away the additional sawdust that has accumulated on the eyelashes and they end up with more sawdust in their eyes than they started with.
Even if you do a fine job of removing a foreign particle from an eye, the particle may scratch the cornea and the scratch will make you think the particle is still in the eye. If that feeling persists, seek medical attention, because the particle may in fact still be there, but invisible. This is often a problem with pine sawdust When pine sawdust is saturated with water, or tears, it becomes transparent. Ophthalmologists use a special dye that makes invisible particles instantly visible and therefore, much easier to remove.
There's nothing like the natural beauty of wood, especially when viewed up close with the naked eye. But the time for doing such viewing is only after a project has been completed and is out of the shop. Then you can take your safety glasses off, lean over and take a good, close look. At all other times, some form of protection should rest firmly between the work you are doing and that most sensitive part of the human anatomy-your eyes.
Dr. Paul F. Vinger is a woodworker and ophthalmologist He lives in Lexington, Mass.
Buying eye protection
by John Decker
A good pair of nonprescription safety glasses only costs about $5, goggles cost about $4 and face shields cost less than S15. Paying for eye protection is not a problem, but knowing how and where to buy it might be.
First, any safety eye wear you buy should have a "Z87.1" logo on it. This logo tells you the eye wear meets a minimum standard for safety set forth by the American National Standards Institute. On safety glasses, look for the Z87.1 logo on the inside of the temples and frames. On goggles and face shields, look for it near the perimeter of the lens or on the lens holder.
You can buy nonprescription safety glasses, goggles and face shields from hardware stores and building supply outlets, but their selection may be limited. Many cities have safety supply outlets that stock a full line of eye safety wear. For one in your area, check the Yellow Pages under safety equipment. Another way to buy eye safety equipment is through mail-order houses such as those listed at the end of this article.
Prescription safety glasses from an eye-care professional. When I visited my doctor, he showed me several pairs of designer-style safety frames, all of which were nearly indistinguishable from regular eyeglasses, save the slightly heavier bridge piece around the nose and the Z87.1 logo stamped clearly on the frame and temples. 1 found a pair of frames to my liking that cost $56. All of the frames came with permanent or clip-on side shields. Because I planned on making the safety glasses my full-time eye wear, I chose clip-on shields.
Regular safety lenses for my glasses cost $24 each. I assumed my lenses would be made of polycarbonate plastic, but the doctor told me they were regular plastic. "Polycarbonate lenses are for people who play racquetball and other high-impact sports," he said After explaining to him about table" saws, lathes and shapers, he readily agreed that polycarbonate lenses would be better. Polycarbonate lenses added $20 to the original $24 price.
Because the frames and lenses both had to be ordered from the factory, it took about four weeks to get my new glasses. The bill came to $130.40, extra side shields included. Quite reasonable, l think, for a pair of glasses I wear in the shop and on the street.
(John Decker is an amateur woodworker in Katonah, N.Y.)
Sources of Supply
- Companies making safety eye wear:
- American Optical Corp., 14 Mechanic 5t, Southbridge, MA 01550; (617) 765-9711
- Bilsom International, 109 Carpenter Drive, Sterling, VA 22170; (703) 834-1070
- Titmus Optical, 1015 Commerce St., Petersburg, VA 23803; (804) 732-6121
- Willson Safety Products, P O. Box 622. Reading, PA 19603; (215) 376-6161
- Mail-order suppliers of safety eye wear:
- Direct Safety Company, 7815 S. 46th St., Phoenix, AZ 85044; (602) 96X-7009
- Industrial Safety & Security, 1390 Neubrecht Road, Lima, OH 45801; (419) 227-6030
- Kenco Safety Products, 70 Rock City Road. Woodstock, NY 12498; (914) 679-5246
- Lab Safety Supply, 3430 Palmer Drive, Janesville, WI 53546; (608) 654-2345
Emergency Eye Care:
Sight might be the most treasured of the five senses. Couple that with how horribly sensitive eyes are to pain and it's a small wonder that dealing with a serious eye injury can strike a sense of fear, shock and even revulsion among many. Regardless, a cool head must prevail in any emergency.
I'm going to give you the basics for dealing with eye injuries. We'll consider the minor ones first, then some more serious cases. But before we start, remember this most important rule: If you have doubts as to the extent of any eye injury, treat it as a serious one. Seek medical help immediately. And, don't ever hesitate to call an ambulance if the injury goes beyond the scope of your ability to handle it.
Particles: If the particle is floating freely on the surface, flush the eye with water. Never remove imbedded or protruding objects from an eye, no matter how small the object may be. Instead, cover the eye with a sterile dressing and seek medical attention as soon as possible.

Blows: If an eye receives a heavy blow, apply ice and cold compresses to relieve swelling and pain. If there is pain inside the eyeball or a change in vision, seek medical help immediately. This is an injury where it's best to err on the side of caution and see a doctor.
Perforations: The laceration or perforation of an eyeball or eyelid, or signs of blood between the cornea and iris (see the drawing), indicates the need for emergency medical treatment.
If you suspect that an eyeball has been punctured or lacerated, place no pressure on the eye. The instinctive reaction for anyone with this kind of injury is to rub or press the eye. You must stop them, or if the injury has happened to you, you must stop yourself from applying pressure.
The eye is filled with a clear substance called the vitreous humor. It looks like raw egg whites. Pressing a punctured eye can force vitreous humor through the wound, an action that may also cause sections of the retina to detach and exit through the wound. The body can regenerate vitreous humor, but losing part or all of the retina results in permanent partial or total blindness.
If possible, apply a light, sterile dressing to the wound and cover the eye socket with some type of shield, such as a piece of cardboard, so no additional pressure will reach the eyeball. Don't hesitate to call an ambulance. Keep the injured person as still and as calm as possible and don't try to remove any object imbedded in the eye.
Chemicals: Most chemicals used in woodworking will cause extreme pain if they contact the eye. Acids and alkalis cause the most damage to an eye, but any chemical in the eye should be treated as an emergency. Flush the eye with water for at least 10 minutes as soon as possible before professional medical attention is sought. The instinctive reaction of anyone with a chemical in an eye is to tightly shut the eyelid. You've got to force that eyelid open by hand and flush the eye as quickly as possible. If a chemical splashes in your eye, hold your eyelid open and flush the eye immediately. It will hurt, but you've got to do it.
Keep in mind that this is an emergency, so you don't have to be picky about the water you use. Soft drinks or even beer will suffice, at least to start with. Never try to neutralize acids or alkalis. If you can, bring the container of the chemical that splashed into the eye to the hospital or doctor's office. If that's not possible, be sure to tell the doctor what kind of chemical it was.
Other problems: Blurred vision that doesn't clear with blinking, or a loss or narrowing of the visual field in one eye are danger signs. Double vision, sharp, stabbing pain or deep, throbbing pain are also signs that medical help is needed. One eye that protrudes farther than the other, or even an eye with a pupil diameter that doesn't match the other, are indications of serious injury. Eye pain that lasts more than a day or two should also be considered serious and referred to professionals.
There are ways you can help both the attending physician and the person suffering with an injured eye. First, never apply ointment to an eye, because it will obscure the doctor's view of the retina. Also, don't repeatedly apply over-the-counter topical anesthetics to a painful eye; continual use can damage the cornea. Above all, remember the first rule I gave you: When in doubt, seek medical attention. - P.V.
Dust and the Woodworker
In 15 minutes of use, this disc sander filled a shop's atmosphere with a cup of powdery dust, the size that can negotiate your lung's smallest airways. The Occupational Safety and Health Administration (OSHA) recommends that your short-term exposure limit (STEL) be less than one rounded teaspoon of dust in a 24-ft. by 24-ft. shop in 15 minutes. OSHA's permissible exposure limit (PEI) for an eight hour shift is about one-half of a teaspoon of dust suspended continuously in the same shop's atmosphere.
What serious woodworker doesn't know the pleasure of wiping a delicate film of very fine dust off a well-waxed jointer bed? I like reaching into a table saw base and spilling out arm loads of wood dust onto my knees and the surrounding floor. In fact, I don't mind dust in my hair, in my beard and in my pockets. And I've not only come to love the feel and sight of wood dust, but the satisfying aroma as well. I was first tempted to start woodworking when my best friend built a cedar porch swing for me-the air in his shop was filled with the rich scent of the wood. Since then, I've built my own shop and filled the air with dust from a dozen different woods, including sassafras, walnut, redwood, mahogany, teak, cherry, maple, oak and poplar.
Yes, the woodworker in me enjoys wood dust, but the doctor in me is suspicious because the dust so often irritates my eyes and lungs. My concerns led me to the hospital library to research woodworking's effects on the respiratory system. What I found was both surprising and a little disconcerting. A computer search of medical literature revealed more than 250 articles pertaining to the hazards of woodworking. The articles covered a wide range of problems, including traumatic injuries, skin disorders and cancer associations, but most dealt with how wood dust inhalation affects the lungs.
How much dust is harmful? - Wood comes off tools in many different shapes and sizes, including broad, flat shavings; long, thin splinters; small chips; and coarse and fine powdery dust, such as that produced by the disc sander shown above. Hand-sanding produces fine dust. But power sanders, the big guns in the sanding arsenal, are the tools most responsible for creating lingering dust clouds in the shop. Powdery dust consists of the smallest particles and represents the greatest health hazard to the lungs. This fine powdery dust not only floats in the air for a long time, but it can be inhaled very deeply.
Dust particles can be classified into two groups: those smaller than 10 microns in diameter and those larger than 10 microns (one micron equals one millionth of a meter). The smaller particles are respirable: they are little enough to negotiate the tiny airways that reach deep into the lungs. Particles bigger than 10 microns tend to get trapped in the larger airways.
Wood dust, as inviting as it may be, is no friend to the woodworker. Given the fact that most of us are not going to sacrifice woodworking to save our respiratory system, the question arises: How much wood dust is too much? Two variables that must be considered are the amount of dust you breathe and how long you breathe it. If you spend just a few hours per week in the shop or if you work mainly on small projects that do not demand much sawing and sanding, you probably do not have to worry about bronchitis, pneumonia or nose cancer. If, however, you spend long hours on big projects that require extensive ripping and sanding, you should be cautious, especially in light of the small amount of dust that researchers and government regulators say is the threshold limit for ambient dust (beyond which lung disease begins to develop).
According to a 1981 report published by the American Conference of Governmental Industrial Hygienists, the maximum level of airborne respirable particles should average no more than five milligrams of dust per cubic meter of shop space in eight hours. Other studies suggest that this level is too high and recommend a maximum of two milligrams of dust per cubic meter. These studies propose that more than two milligrams of wood dust per cubic meter of shop space may damage your lungs.
What do these limits mean to you? Let's suppose your shop is 27 ft. long by 21 ft. wide and the ceiling is 9 ft. high, so it is roughly 170 cubic meters According to the stricter guideline of two milligrams of dust per cubic meter, you should limit airborne dust to less than 340 milligrams. This is one-third of a gram, which I discovered equals slightly less than one-quarter of a teaspoon of dust. A full sandwich bag weighs almost 50 grams, which is enough to exceed the threshold limit of a 25,000-cubic-meter shop. This is all very disconcerting and even the authors of the cited study conceded that, though ideal, this strict (two milligram per cubic meter) standard is not very realistic.
A Guide to your Respiratory System - Dust's affect on your lungs, however, is realistic, but you must first understand your respiratory system so that you realize just how injurious dust can be. The lungs are extraordinary, organs that continually bring fresh air into very close contact with your body's circulatory system. Structurally, the lungs are like sponges with millions of tiny air pockets. Their ultimate purpose is to remove carbon dioxide from the blood stream and replace it with fresh oxygen from the atmosphere. This process is called gas exchange. The air pockets are called alveoli, shown in the drawing on the facing page and gas exchange takes place within them. When you breathe in, the alveoli fill with air and oxygen passes through their ultra-thin walls and into the surrounding blood. At the same time, carbon dioxide from the blood passes into the alveoli, where it is expelled during exhalation.
The flow of air in the lungs takes place through a set of airways that spread out very much like the branches of a tree, as shown in the drawing. The tree trunk corresponds to the trachea, the first large branches are the bronchi and the smaller branches are the bronchioles. In this analogy, the alveoli are like the leaves of the tree.
In addition to moving air in and out of the body, the lungs must keep themselves and the air clean, warm and moist This job is accomplished by the "mucocilliary transport" system, a term for the mucus-producing tissue that lines the "bronchial tree" (see the drawing). We are all familiar with mucus, though we may not be familiar with its purpose. Not only does it serve to moisten the air, it also protects the underlying tissue from drying out. In addition, it acts like flypaper to catch the microscopic dust and dirt in the air we breathe. Once these dust particles are trapped, they must be discarded. This is done by the other part of the mucocilliary transport system, the ciliated epithelial cells. These cells have hundreds of tiny little arms that literally sweep the dust-laden mucus up and out of the lungs. In addition, a backup mechanism, the "alveolar macrophage," serves to clean out dust that gets into the alveoli. This system consists of cells that wander around in the alveoli like little street cleaners, sweeping up particles that threaten to interfere with the crucial gas-exchange system.
How Does Dust Harm These Organs? - In the healthy person, occasional dust particles in the lungs is not a serious problem because the lungs have built-in defense mechanisms, such as the mucus that lines the airways, that halt harmful substances like dust. The dust-laden mucus is then expelled from the lungs by the sweeping-motion cells lining the airways, as well as by coughing. Unfortunately, however, chronic inhalation of wood dust may damage the lungs' cleaning systems. When this happens, a vicious circle begins as more dust collects and further damages the lungs. The body then responds as it does to skin injury-it mobilizes an inflammatory response. That is, the bronchial airways become red, swollen and painful. Swelling decreases the diameter of the airways and produces shortness of breath, induces coughing and increases sputum, which is saliva and other discharged matter from the respiratory passages. A number of studies have shown that these symptoms are common in active woodworkers: those that spend long hours in the shop. Other studies have shown that woodworkers tend to develop lung problems similar to those found in patients with chronic bronchitis and emphysema-diseases associated primarily with cigarette smoking. Inhaling wood dust, while probably not as harmful as smoking, can be dangerous.
Perhaps the most documented effect of wood-dust exposure is nose cancer. Dozens of studies in more than 10 countries have shown an increased rate of this relatively rare form of cancer among woodworkers. Medically it is known as "nasal adenocarcinoma." Mucus-secreting glands in the noses of woodworkers tend to become cancerous at a rate 1,000 times greater than non- woodworkers, apparently because of the dust. Fortunately, this type of cancer is relatively rare even among woodworkers (only about one in 1500 active woodworkers will ever develop it) and the time-lag between exposure and the onset of symptoms is as much as 40 years.
Finally, wood dust can cause respiratory illness because it contains many types of allergens and toxins. These range from chemicals deposited on the tree from the outside, such as pesticides and fungal spores, to chemicals created by the trees themselves, such as alkaloids, saponins, aldehydes, quinones, flavonoids, steroids and resins. Individuals respond differently to these various toxins, bur the symptoms are universal: coughing, sneezing, increased phlegm and sputum production, runny nose, red eves and, in extreme conditions bronchitis, pneumonitis and asthma. These symptoms are found in woodworkers more often than in the general population.
You are probably more familiar with some toxins and allergens than with others. Perhaps woodworkers are most aware of the allergen called plicatic acid, a substance in red cedar that is responsible for a condition known as red-cedar asthma. This very debilitating condition occurs in about 5% of people who work with red cedar. Another similar condition is maple-bark disease, a severe form of asthma probably caused by fungal spores found in maple bark. Two other North American woods considered to have significant allergenic effects are boxwood and sequoia redwood.
Clearly, the concern about dust is not just academic and all of us woodworkers must be aware of these insidious problems. Most of us don't hesitate to use goggles, push sticks and blade guards, but how many of us use face masks and dust collectors regularly? Not many, I'm afraid. Dust masks can be uncomfortable and dust collectors are expensive, but both are well worth the investment. As with many other items I've bought for my shop, I've agonized over spending money on a dust-collection system, but I'll probably wonder how I ever got by without it once I use it.
Kirk Kundtz is a resident physician in internal medicine at Mount Sinai Hospital in Cleveland, Ohio and is an active woodworker. Thanks to Drs. Lawrence Martin and James Edmonson for assistance in preparing this article.
Sources of supply - Dust masks and personal protective equipment are manufactured by:
- Louis M. Gerson Co., Inc., 15 Sproat St., Middleboro, MA 02346; (508) 947-4000
- Glendale Protective Technologies, 130 Crossways Park Drive, Woodbury, NY 11797; (516) 921-5800
- Mine Safety Appliance Co., Box 426, Pittsburgh, PA 15230; (412) 967-3000
- North Healthcare, 1515 Elmwood Road, Rockford, IL 61103; (815) 877-2531
- North Safety Equipment, 2000 Plainfield Turnpike, Cranston, Rl 02921; (401) 943-4400
- Racal, Airstream Division, 7305 Executive Way, Frederick, MD 21701; (301) 695-8200
- 3M/Occupational Health & Environmental Safety Division, 220-3E-04 3M Center, st. Paul, MN 55144- 1000; (800) 328- 1667, (612) 733-8029
- U.S. Safety, 1535 Walnut st., Kansas City, MO 64108-1312; (816) 842-8500
- Willson Safety Products, Box 622, Reading, PA 19603; (215) 376-6161
(Reprinted from the July/Aug., 1990 issue #83 of "Fine Woodworking" by the Taunton Press, Inc., 63 South Main St., Newtown, CT 06470. Not for Resale).
Getting Out of the Dust
by Theodore J. Fink, M.D
Getting rid of dust in a woodshop is like trying to eliminate salt from your diet, which is impossible because almost everything you eat or drink contains sodium. So the goal is not to totally eliminate dust, but to minimize your exposure. This can be accomplished with a three-phase dust-control plan that includes: decreased dust production, wood dust capture and personal protection.
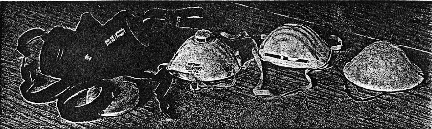
3M's model 8500 dust mask on the right, should be used 'for comfort only," and isn't approved by the National Institute for Occupational Safety and Health (NIOSH). The Gerson 1710 and 1725, in the center, are approved for dust and some mist protection. Tl 1725 has an easy-breathing valve. The NIOSH-approved Willson 1200 series cartridge respirator, on the left, comes with replaceable particle filters and an assortment of cartridges is available that protect you from a variety of hazardous chemical vapors and mists.
Decrease your dust production: Your woodworking techniques and tools determine the quantity and size of dust particles you produce. The less hazardous not respirable large particles settle quickly and are more easily captured by dust collection systems. The finest dust particles, which are the most hazardous, tend to escape most collection methods. If you shine a beam of light through a dark presumably clean workshop, the airborne particles you will see are those larger than 20 microns in size. Respirable dust (under 10 microns) is invisible.
You can reduce very fine wood dust by minimizing the need for sanding. By cutting rather than scraping when turning wood and by planing and scraping rather than belt sanding, you will produce shavings rather than dust. All saw blades, planer blades and bits should be sharp, because dull blades produce finer dust. You should select the proper blade and feed rate to produce smoother surfaces when sawing. When bandsawing scroll work you can get a finer finish requiring less sanding by using a blade with more teeth per inch (t.p.i.) and with standard tooth form (not a hook tooth). When ripping with a hook-tooth blade, be sure it has a large-size gullet that will accommodate large particles and use a fast feed rate. To decrease the amount of finish- sanding, be sure stock is precisely dimensioned by planing and jointing before assembly.
Dust capture: Despite your best efforts, you will make dust. Therefore, you should attempt to capture the dust before it becomes airborne. The most efficient method includes a dust-collection system hooked directly into stationary tools (see FWW #67, p. 70). Also, when buying small power tools, such as sanders and power planes, select those equipped with dust collection bags. Although these are commonly called "dustless" and greatly reduce the amount of dust put into the air, they fail to capture some of the very fine dust.
Whenever wood is machined, a wide assortment of particle sizes is produced and to each particle a positive electrical charge is imparted. This is especially important for the smallest particles, which, because of low mass and positive charges, remain suspended in air for hours after production. Eventually these fine particles do settle, but because they repel each other, they are easily suspended in the atmosphere when swept with a broom. Thus, it is much better to vacuum dust whenever possible.
Skin and eye protection: Coveralls that can be taken off before leaving the shop protect most of your skin. The coveralls should be cleaned regularly and dust remaining on skin and hair should be washed off immediately after leaving the shop.
Standard safety goggles provide some eye protection from fine dust, but if you are using a very irritating wood or one to which you have developed an allergy, an airtight full-face mask or diver's (under water) goggles may be necessary.
Personal protective equipment and dust masks: The amount of exposure to the skin and eyes is minuscule compared to the surface area in the respiratory tract. Furthermore, all the respiratory surfaces are moist and very reactive to foreign substances. Thus, the most critical personal protective equipment is the dust mask or personal protective equipment.
These items, which must cover nose and mouth, vary widely in cost, comfort and effectiveness. The most comfortable, least expensive and least effective is the lightweight molded mask that is commonly held in place by a single elastic band, such as the 3M 8500 (shown above on the right) or the Gerson 1501 (not shown). Although these masks filter out up to 95% of airborne dust, air leaks readily around their edges. Neither mask is approved by the National Institute for Occupational Safety and Health (NIOSH).
3M's Model S710 mask (not shown) and the Gerson 1710 mask (shown above, second from the right) filter in excess of 99% of respirable dust. Both have two wide elastic straps for a tight, form fit, yet they're still quite comfortable, lightweight and disposable. And they are durable enough for extended use. Both are adequate for fine-dust protection, but not for harmful vapors.
If you need protection from paint, varnish or other harmful vapors, as well: dust particles, NIOSH recommends a cartridge-type mask such as the Willson 120 respirator (shown above on the left) or similar model from 3M, U.S. Safety c North Safety Equipment. The Willson comes with replaceable particle filters an you can purchase an assortment of cartridges that protect you from a variety hazardous chemicals.
Masks and personal protective equipment are only as good as their fit and a tight fit may be difficult you have a beard. The air helmet, such as the Airstream Dust Helmet (or similar battery-powered air-purifying personal protective equipment/hard-hat combinations), may be a solution for bearded woodworkers.
Respirable dust remains suspended in the air for hours and it's invisible. Therefore, once you put on a mask or personal protective equipment for a dust- producing operation in the shop leave it on for the rest of the workday.
As a mask or personal protective equipment is used, retained wood particles clog its pores and breathing becomes more difficult. As this happens, the effectiveness of dust captured by the mask actually improves, provided there are no air leaks around the mask. When you notice the increased breathing difficulty, it is time to change filters or the mask.
Before using any personal protective equipment or dust mask always be sure to read and follow all instructions and warnings supplied by the manufacturer and NIOSH.
Dr Fink is an internist in Shelburn, VT, consulting physician for Digital Equipment Corp. and an amateur woodworker.
(Reprinted from the July/Aug., 1990 issue #83 of "Fine Woodworking" by the Taunton Press, Inc., 63 South Main St., Newtown, CT 06470. Not for Resale).
Chemical Hazards of Woodworking
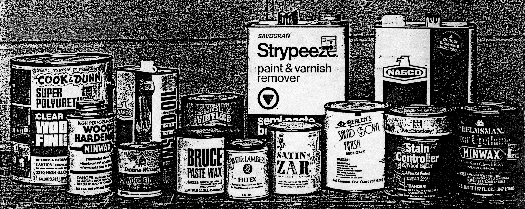
(These products, representative of those found in many woodworkers' shops, all contain hazardous substances. While they all have warning labels of potential dangers, many reveal the contents only as petroleum distillates, which can include a number of dangerous solvents).
All too often woodworkers are needlessly exposed to toxic levels of various chemicals. Sometimes this happens because workers ignore warning labels, but frequently it's because they just don't know enough about the chemical products they use to appreciate the risks involved and take adequate precautions. Toxic chemicals are found in a variety of woodshop supplies, including adhesives, paints and varnishes. By presenting an Overview of the basic principles of chemical toxicity, I hope to drive home the single most important lesson for woodworkers: protect yourself-it is infinitely better to prevent an illness or injury than it is to treat it after it occurs.
The chart should help you identify the products containing potentially harmful chemicals, clarify the risks associated with the most common toxins and choose safer alternatives. The following discussion of chemical hazards and how toxins are absorbed into the body will also help you understand the information presented in the chart.
Hazards of organic solvents - toxicity refers to a chemical's, or solvent's ability to produce a harmful effect on a biological system, in this case, your body. These harmful chemicals, called toxins, often target specific tissues. Benzene, for example, attacks the blood-forming elements in bone marrow. Any chemical can produce a toxic effect. Some do so with a single, brief contact, often called an acute exposure, others require chronic exposure: repeated or prolonged contact. The crucial point is that there are no harmless chemicals, only relatively safe ways of using them.
All chemicals can produce both acute and chronic effect. Acute effects generally happen quickly and the illness lasts only a short time. If exposure is low enough, the effects are reversible. More intense acute exposures can cause permanent damage, even death. Chronic effects, on the other hand, may not be apparent until after weeks, months or even years of repeated exposures and they are usually permanent and irreversible. Some people do not realize that they are being harmed because early symptoms of these effects can vary greatly depending on the type of substance, exposure level and individual sensitivity.
Both acute and chronic effects may be localized or affect the entire system. A local reaction would be something like redness or blistering of the skin at the point of contact. A systemic reaction occurs when the chemical is absorbed into the bloodstream. Harmful effects may occur anywhere in the body, but the toxins in solvents most often affect the central nervous system (CNS). Generally, the chemicals depress the CNS, but some substances like xylene may produce agitated hyperactive behavior. Symptoms of depression of the CNS can include dizziness, headache, nausea, confusion, sleepiness, un-coordination or irrational behavior.
In the workshop, these symptoms not only decrease productivity, but also lead to higher injury rates. However, the damage can be more far-reaching. The brain has very limited regenerative capacity, so once any neurologic deficit is established, it usually becomes permanent. Very high chronic exposure to solvents can cause dementia, resulting in impairments of judgment, insight, orientation and memory This raises a question that is currently being studied: Can repetitive, low-level exposures cause premature aging and reduce mental and physical abilities? Until there is an answer, it is wise to minimize exposure to solvents.
How chemicals get into the body - Chemical toxins can be absorbed into the blood system through the respiratory and digestive tracts as well as through the skin. Many solvents are very volatile and quickly transform into vapors, so inhalation is the main method of absorption. The lung tissue exposed to vapors during inhalation is enormous, totaling about two acres of surface area in the lungs air sacs. Relative volatility of various solvents determined by measuring the vapor pressure (VP) of the evaporating liquid in millimeters of mercury (mm Hg), is shown in the chart on the following two pages. The more volatile a solvent the higher the VP and the more quickly it will fill a room with vapors. Bear in mind that the VP measurements shown were made at 68 °F; any increase in temperature will also increase the volatility.
On the body, a thick outer layer of skin generally forms an effective barrier to most materials. Despite this, many of the organic solvents in wood finishing products, such as methylene chloride or isopropyl alcohol, can penetrate the skin and cause dermatitis and exacerbate the absorption. Also, chemicals are absorbed quickly through cuts and abrasions or areas inflamed by eczema or psoriasis.
Workshop chemicals, like those shown in the photo on the facing page, gain entry to the digestive system in two ways. Consumption of food, drink or cigarettes brought into the shop and contaminated by chemicals is the most common process. A not-so-obvious method involves the lungs. The inner walls of the respiratory tract are protected by a thin fluid layer, which is moved upward by small, constantly moving hairs (cilia). Once the inhaled particles reach the throat they are swallowed and then any chemicals in the particles are absorbed by the stomach and intestines. This situation can easily develop when you don't wear a dust mask while sanding out finishes.
Chemical classifications - Organic solvents can be combined into groups of similar chemical structures and solvent characteristics which simply mean you can generally use a solvent within a group as a substitute for another solvent from that same group. The groups of solvents that woodworkers encounter most frequency include aliphatic hydrocarbons, chlorinated hydrocarbons, aromatic hydrocarbons, alcohols and ketenes, as outlined in figure.
Aliphatic hydrocarbons are often petroleum derivatives, such as naphtha, paraffin, mineral spirits, n-hexane and kerosene. From the chart, you can see that n-hexane, found in adhesives, varnishes and seed-oil extracts, is not only extremely flammable, but can cause peripheral nerve damage resulting in weakness of hands and feet. One of the safest solvents for woodworkers is odorless paint thinner, which is mineral spirits or VM&P (varnish makers and painters) naphtha with the aromatic hydrocarbons removed.
Chlorinated hydrocarbons are identified by the "chloral" or "chloride" in their names. These are good solvents for many paints and varnishes because they are nonflammable, but most are now known to be very toxic, cause damage to the liver and contain carcinogens. For example, methylene chloride, a common ingredient in paint strippers, not only forms carbon monoxide in the body, but it was recently shown to cause cancer. As a result, the government banned its use in cosmetics and further restrictions are expected soon.
Aromatic hydrocarbons show up in a variety of products, from lacquer thinners and strippers to adhesives and Tung oil and present special hazards as a class. The most toxic, benzene, causes destruction of the blood-forming elements and may wipe out these cells, causing aplitic anemia (bone marrow destruction), or result in leukemia. You are not likely to encounter benzene due to current governmental restrictions; however, some of the older products on the back of your shelf may contain this solvent and these should be disposed of properly through your local environmental agencies. Toluene and xylene have been widely used as benzene substitutes and although not as hazardous as benzene, they can still cause serious toxic effects, as shown in the chart.
Among the safest and most important classes of solvents are alcohols, which are found in many types of finishes and other products. Methanol or wood alcohol, which is by far the most toxic of this group, can damage the optic nerve and cause blindness. Ethanol, or grain alcohol, is the least toxic alcohol and has about half the depressant effect on the brain and spinal cord as isopropanol (isopropyl or rubbing alcohol).
Ketenes are commonly used in quick-drying finishes and have become more widespread with the increased popularity of vinyl resin finishes. Of the many ketenes, three commonly cited on labels are acetone, methyl ethyl ketene and methyl isobutyl ketene. Methyl n-butyl ketene, which you might find in an old product, has generally been banned because it can cause severe nerve damage, the symptoms of which appear gradually over weeks or months and consist of numbness, tingling and weakness in hands and feet. The safest solvent of the ketene group is acetone; however, it is extremely flammable and a real fire or explosion hazard.
Other hazardous material - adhesives represent another large group of potentially hazardous materials, as illustrated in figure 2 on p. 62 and should be treated with caution. Some are dangerous because of the flammability of their solvents, such as nitro cellulose cement with 39% acetone and contact cements with various volatile hydrocarbons. Other common adhesives that have lower toxicity are white glue, also known as polyvinyl acetate (PVA), yellow glue (modified PVA/aliphatic resins), hide glue, hot-melt glue (hydrocarbon resin: 50%, ethylene vinyl or acetate copolymer: 45%, wax: 5%) and wet casein glue. These may, however, cause skin irritation or skin allergies. And casein dust, from mixing dry powders, may irritate the upper respiratory tract.
Limiting toxic exposure - Always choose the least-toxic solvent that will get the job done and always follow the manufacturer's recommendations for safe use. Product labels are now more detailed than ever and should always be your first source of toxicity information. All warnings on labels, such as use in well-ventilated area, should not be taken lightly. For more detailed information on the safe use and storage of a particular product, request a material safety data sheet (MSDS), which is outlined on the facing page. The new United States and Canadian right-to-know laws require employers make MSDSs available to employees working with potentially hazardous materials. MSDSs are also available from either the product manufacturer or the local distributor.
| Hazardous Solvents or Materials | Comments | Organs Affected | Symptoms | |
|---|---|---|---|---|
| Nitro cellulose cement | Acetone (39%) | See figure 1. | - | - |
| Casein (dry powder) | Strong alkalis | Irritating dust possible when mixing powders. | URT, lungs, eyes | Irr. |
| Plastic resin glues (urea-formaldehyde) and resorcinol | Formaldehyde | Out-gases formaldehyde, a suspected carcinogen. Avoid breathing powder and fumes. Wear appropriate gloves. Fumes may arise from machining plywood. Formaldehyde has a TLV of 1 PPM. | Skin, eyes, URT | Irr. bronchospasm, pulmonary irr., derm., nausea, vomiting |
| Epoxy hardeners and resin | Aliphatic amine, diglycidyl ethers | Main toxicity is due to extremely alkaline amine curing agents, which are highly caustic. Uncured liquid resins are irritants and sensitizers. See figure 1. | Skin, eyes, URT | Irr., burns, allergies |
| Instant glues and accelerators | Cyanoacrylate, freon | Bonds skin, which requires solvent (acetone) to separate. | Skin, URT | Irr., pulmonary edema, headaches |
| Acrylic plastic glues | Methyl methacrylate | TLV is 100 PPM. | Skin, URT, eyes | Irr., mucous membrane irr. |
| Contact cements | Aliphatic and chlorinated hydrocarbons | All are toxic, solvent based and most are highly flammable. See figure 1. Nonflammable cements contain 1-1-1 trichloroethane (methyl chloroform). | Skin, CNS, CVS, eyes, liver | Headache, irr., derm., CNS depression, narcosis, more. See figure 1. |
Since chemical toxicity's usually occur through inhalation and skin contact, it is important that such exposures be minimized to prevent injury. Provide adequate ventilation by exhausting fumes away from you to the outdoors with a source of fresh replacement air. This can be facilitated by placing a fan to your side, blowing across the work area toward the means of exhaust. A fan blowing from behind can actually create a low-pressure area directly in front of your body, drawing the toxic fumes toward you.
In addition to ventilation, most manufacturers recommend using a personal protective equipment, which is available in a variety of styles from a low-cost disposable mask to a full-coverage, self-contained breathing apparatus that has numerous filtering media designed to handle specific toxins and concentrations. Consult the package, MSDS or manufacturer for the protection appropriate for, your situation. Many solvents can be effectively filtered through activated charcoal. However, check with manufacturers first, because there are no approved filters or cartridges for certain solvents, such as methanol and methylene chloride. There also aren't any that will protect you from very high concentrations of chemicals, such as from a spill, which cause cartridges to saturate quickly. Even when exposed to low concentrations of contaminants, activated cartridges have a limited life span. Again, consult manufacturers for the cartridges life span, keep track of the time you wear them and seal them in a plastic bag when not in use because exposure to air decreases their useful life span.
Effective function of personal protective equipment depends on proper fit, which can be checked by placing your hands over the cartridges, sucking in and holding your breath. If there is an air leak, the mask will return to its original shape. The Occupational Safety and Health Administration (OSHA) requires more formal fit tests and employers should check with their personal protective equipment supplier for more details. Because beards prevent masks from sealing tightly to the face, OSHA usually, requires bearded employees to wear "air-powered" personal protective equipment, which supplies filtered air under pressure to a mask or hood. Home or self-employed bearded users can try smearing their beards with petroleum jelly for a tighter seal. If the chemical you use is also an eve irritant, use full-face personal protective equipment that covers the eyes.
To prevent direct skin contact, wear gloves specified by the chemical manufacturer. This is important even when using a nontoxic finish because it may require using a solvent, such as mineral spirits, to remove the finish from your hands. Barrier creams, also a skin protection method, are less effective and should only be used to resist occasional splashes rather than direct contact. Try to avoid using solvents to clean your hands and be sure to wash with plenty of soap and water after handling any solvents.
All of these precautions are meant for healthy adults. You may need to take extra precautions if you have heart disease, lung problems, chronic illnesses or disabilities, or take medication. For example, methylene chloride is known to cause heart attacks and should be particularly avoided by someone with coronary heart disease. Children and the elderly also are at greater risk from solvents and chemicals. Children under 13 should not work with solvent- containing materials. At greatest risk is the fetus. From before conception through cessation of breast feeding, women should avoid exposure to all chemicals. Also, chemical exposures should be avoided by men prior to conception to reduce the risk of genetic abnormalities.
All woodworkers should consult their physicians anytime they experience any of the previously mentioned symptoms. Always be prepared to help physicians make a diagnosis by telling them the chemicals you use and that you are exposed to wood dust. And even if you have no symptoms, have regular checkups.
Dr Fink is an internist in Shelburne, VT, a consulting physician for Digital Equipment Corp. and an amateur woodworker.
Further reading:
"Artist Beware" by Michael McCann. Watson-Guptil Publications, New York, NY; 1979.
A large variety of good information is available from the Center for Safety in the Arts, 5 Beekman St., New York, NY 10038.
"Chemical Hazards of the Workplace" by Nick Proctor and James Hughes. J. B. Lippincott Co., Philadelphia, PA; 1978
"Handbook of Organic Industrial Solvents" (LC-TG-07-683) by Alliance of American Insurers, 1501 Woodfield Rd, Suite 400 W., Schaumburg, IL 60173; 1987.
"Industrial Toxicology" by Phillip Williams and James Burson. Van Nostrand Reinhold Co., New York, NY; 1985.
"A Distinct Pattern of Personality Disturbance Following Exposure to Mixtures of Organic Solvents," Journal of Occupational Medicine, Vol. 31, No. 9, (Sept. 1989), by Lisa Morrow, Ph D.. et al.
"Neurobehavioral Effects of Solvents," Journal of Occupational Medicine, Vol. 30, No. 2, (Feb. 1988), by Edward L. Baker, M.D., et al.
"Occupational Diseases" by U.S. Department of Health, Education and Welfare, U.S. Government Printing Office, Washington, DC; 1977.
"Organic Solvent Neurotoxicity" (Publication No. 87-104); March 31, 1987 and Pocket Guide to Chemical Hazards (Publication No. 85114); September, 1985, by U.S. Department of Health and Human Services, National Institute for Occupational Safety and Health (NIOSH), 4676 Columbia Parkway, Cincinnati, OH 45226.
"Solvents in Museum Conservation Labs" by Center for Safety in the Arts, 5 Beekman St., New York NY 10038; 1985.
"Threshold limit Values and Biological Exposure Indices for 1987-88" by American Conference of Governmental Industrial Hygienists (ACGIH), 6500 Glenway Ave., Building D-7, Cincinnati, OH 45211; 1987.
Reading a Manufacturer's Safety Sheet
by Charley Robinson
A Material Safety Data Sheet (MSDS) provides helpful information for working safely with potentially hazardous chemicals. Employers must have an MSDS for products that contain hazardous ingredients, but you should be able to obtain one from chemical suppliers or a manufacturer's technical or customer service department. Some companies are now including an 800 hot-line number on the product label that you can call for additional information.
All MSDSs must contain certain information. OSHA has suggested a format, as shown below, but many manufacturers develop their own style. Generally, information is organized in sections and is self-explanatory. The following terms and information will help you further understand the MSDS.
Identity: The product trade name, chemical name and usual synonyms.
Section II - Hazardous ingredients: Each hazardous ingredient comprising more than 1% of the total, or more than 0.1% if carcinogenic, must be listed, except those ingredients the manufacturer claims are a trade secret. Any known health hazards of secret ingredients must be disclosed in a later section. Many ingredients, especially trade secrets, have never been studied, so their risks are unknown. Ingredients, such as formaldehyde, that can produce toxic effects at levels less than 0.1% must be indicated. This section indicates OSHA-permissible exposure levels (PEL) and short-term exposure limits (STEL), which are OSHA-enforced Also, the threshold limit values (TLVs), updated annually by the American Conference of Governmental Industrial Hygienists (ACGIH) are included. AH of these values are expressed in parts per million (PPM). The PEL and TLV numbers indicate the airborne contaminant levels that most healthy, adult workers may be repeated y exposed to for 8 hours a day, 40 hours a week without adverse effect. The STEL number is the maximum concentration of contaminant that a worker should be exposed to for a specified time, usually 15 minutes.
Section III - Physical data: An essential piece of information is the vapor pressure (VP), which indicates the force exerted by the evaporated vapors on the atmosphere directly above the liquid, usually in millimeters of mercury (mm Hg). The greater the vapor pressure, the more volatile the liquid.
Section IV - Fire and explosion hazards: The flash point (FP) is the lowest temperature at which vapors above a volatile combustible substance ignite in air when exposed to flame. Materials with a FP below 100 °F are dangerous because a spark or static electricity can cause a fire or explosion. No FP means the material is nonflammable. The appropriate fire extinguisher and special fire hazards, such as spontaneous combustion from linseed oil-soaked rags, should also be specified here.
Section V - Reactivity data: A chemical's stability, its likelihood of reacting with other materials and all special cautions to be taken, as shown on the form, are revealed here. Don't mix chemicals without reading this section.
Section VI - Health hazard data: This section usually specifies how chemicals normally enter the body, the acute effects of exposure, signs & symptoms of exposure and emergency & first-aid procedures. A manufacturer must identify all ingredients classified as a carcinogen by OSHA, the International Agency for Research on Cancer (IARC) or the National Toxicology Program (NTP).
Section V - Reactivity data: Because of manufacturers' concerns for liability, protective measures are often geared to the worst possible circumstances, such as a large spill. A manufacturer might suggest, for example, using a self-contained breathing apparatus when any approved personal protective equipment would suffice for limited exposure.
Charley Robinson is Assistant Editor at FWW.
(Reprinted from the Jan./Feb., 1990 issue #80 of "Fine Woodworking" by the Taunton Press, Inc., 63 South Main St., Newtown, CT 06470. Not for Resale).
Health Hazards in Woodworking
Simple precautions minimize risks
by Stanley N. Wellborn
(Stan Wellborn, who writes on educational and social trends for a national news magazine, is Washington correspondent for Fine Woodworking.)
Industrial woodworkers have long recognized the risks of their trade. But it has been only in the past few years that artists and craftsmen have become concerned about or even aware of the many hidden dangers in woodworking.
Of course everyone recognizes those hazards that cause immediate and traumatic injury. Blades that cut fingers and limbs, wood chips and fragments that fly into eyes, loose clothing or long hair that catches in whirling machinery, smashed fingers and toes, muscle strains from heavy lifting. But now medical authorities in the United States, Canada and England cite a number of insidious causes of disease that can be directly attributed to woodworking. Their list includes wood dust, sap and oils, mold and fungus, chemical additives, toxic solvents and adhesives, vibration and noise.
A diligent search of medical literature, or a chat with an industrial hygiene specialist, will turn up dozens of horror stories about the health hazards of woodworking. For example, the 43-year-old woodworker who had operated a lathe for more than 25 years and became worried about a persistent sinus irritation and sore throat. His doctor prescribed a standard treatment, yet the condition did not improve. Finally, lab tests revealed cancer of the nasal passages. Or the art student who broke out in a rash, with blisters resembling second-degree burns, shortly after she began to sculpt wood. When she stopped woodworking, her skin healed.
The mere existence of a medical case history doesn't mean every woodworker will succumb to serious disease; the biggest unknown is often the size of the risk. In most cases, woodworkers can take adequate precautions for relatively little cost. Common protective measures are described in the box on page 56. Woodworkers who notice something wrong with their health would be wise to suspect something in the shop; some potential problems are discussed below.
Respiratory ailments: Health authorities warn that woodworkers should be most on guard against inhaling foreign substances.
To most woodworkers, concern about the cancer causing potential of wood dust overrides all other health worries. Indeed, this concern appears justified, at least on the surface. Woodworkers are 500 times more likely to have certain types of nasal cancer than non-woodworkers. However, the risk of developing cancer solely through exposure to wood dust is quite low.
"The statistics on cancer in woodworkers can be made to sound quite alarming," says Dr. Julian A. Waller of the University of Vermont Medical School and an authority on health hazards in the arts. "But the actual risk advances only from 'extremely rare' to 'rare.' Only one woodworker in 1,400 will get this cancer and at that after an average of 40 years of exposure."
Nevertheless, in various health hazard evaluations conducted by the National Institute of Occupational Health and Safety (NIOSH) in Cincinnati, Ohio, investigators have concluded that wood dust is at least a contributing factor in the development of some other types of cancer. In a report prepared after an evaluation of the Cooper Union School of Art in New York City, the Institute cites studies pointing out that "cancers of the larynx, tonsils, tongue and lung have been reported to have resulted from inhalation of wood dust" among furniture workers in England and Sweden.
In addition, the NIOSH report mentions that many researchers have found that the normal functions of the mucous membranes in the nose, throat and lungs were impaired in workers exposed to wood dust for more than ten years.
Among the most recent and thorough research on this problem is a study done by Dr. Samuel death records Jr., of the State Department of Social and Health Services in Olympia, Wash. He reviewed the death records of more than 16,000 members of the United Brotherhood of Carpenters and Joiners of America and found that the results supported the hypothesis that wood contains carcinogens. The study also found an above-average incidence of leukemia and lymphoma among millwrights, lumber workers and cabinetmakers.
Although risk of cancer from exposure to wood does appear to be low for most woodcrafters, the incidence of other forms of respiratory illness is high. At one time or another, virtually all woodworkers have suffered irritation of the upper respiratory tract after breathing sawdust. The condition is usually transient and produces coughing, wheezing and tightness in the chest. Frequently, however, long-term exposure produces "fogged lungs" on X-rays and a type of occupational asthma that can become virtually permanent.
Redwood dust, for example, is the cause of sequoiosis, an acute illness that resembles pneumonia. It usually appears within a few hours after exposure and its symptoms are shortness of breath, bronchio-constriction, dry coughing, chills, sweating, fever and general malaise. Repeated episodes of this ailment can cause permanent scarring of lung tissue.
Wood dust from another tree, the Western or Canadian red cedar, causes similar symptoms that can develop into asthma or rhinitis, an inflammation of the nasal passages.
Medical researchers believe the causative agent in red cedar is picric acid, which is thought to give the wood its characteristic fragrance. Lumber workers in the Pacific Northwest are frequently affected by cedar dust. One medical case history tells of a 30-year-old worker who could breathe at night only by kneeling on his hands and knees. When he left the woodworking industry, he regained his health.
Another source of respiratory difficulties is the mold and fungus that grow in damp areas of the shop, particularly in piles of sawdust. Mold has also been known to cause serious reactions in skin and fingernails after continuous exposure.
Occupational health experts agree that the obvious and best way to prevent respiratory problems is to cut down the amount of airborne dust in the shop Although no specific environmental standards for allergenic wood dust have been established by the federal Occupational Safety and Health Administration (OSHA), the American Conference of Governmental Industrial Hygienists has set a provisional (and very low) limit on "nuisance dust" of 5 mg per cubic meter of air space. A few minutes of steady hand-sanding normally produce about 15 mg per cubic meter in the immediate work area; a portable or stationary belt sander will generate about 150 mg per cubic meter. Without ventilation, the dust will remain airborne for hours and spread through the shop.
Skin irritations and allergies: A large number of wood species will produce skin irritation or glandular swelling in sensitive individuals who are directly exposed to their dust, oil or sap. Some woods, such as West Indian satinwood and mansonia are classified as "primary irritants" because they are highly toxic and are likely to produce skin eruptions or blisters in most people on first contact. Others, such as cocobolo, are "sensitizers" that may cause allergic dermatitis only after repeated exposure.
A number of domestic U. S. woods have been mentioned in medical literature as causing skin irritations, such as hives and rashes, but such skin reactions are actually quite infrequent, occurring in less than 2% of the population. However, the problem becomes much more serious with tropical or exotic woods. A partial list of toxic timbers is given in the box on this page.
Dermatologists who have investigated wood allergies note several common characteristics. Allergic reactions are more pronounced during the summer, or when a person's skin is moist from perspiration, or when the wood dust itself is damp. Reactions are more frequent among persons older than 40. Freshly cut wood is much more likely to be an irritant than older, seasoned wood. Occasionally, a wood species from one geographic area will not affect a woodworker, while the same species grown somewhere else will.
In most cases, it is the heartwood rather than the sapwood that is responsible for skin allergies and it is the accessory substances, or "extractives," from the heartwood that produce the toxic effects. Extractives are whatever can be leached out of the wood (with water or other solvents) without changing its structure. These powerful chemical components and resins, alkaloids, tannins, acids, salts and gums vary widely from species to species and even from log to log. In some trees they make up as much as 20% of the wood structure. Most woods contain about 4% to 10% extractives. The effect of extractives can be devastating. One report cited a serious outbreak of dermatitis among workers at an English furniture plant that used mansonia wood. The entire operation had to be shut down for weeks.
Toxic Woods
This list includes woods that are known to cause allergic, toxic, infectious or respiratory reactions. Although researchers point out that not everyone is sensitive to these woods, they warn that woodworkers should be particularly cautions when sanding or milling them. The category "respiratory ailments" includes bronchial disorders, asthma, rhinitis and mucosal irritations; "skin and eye allergies" includes contact dermatitis, conjunctivitis, itching and rashes. -S.N.W.
| Wood Type | Respiratory ailments | Skin and eye allergies |
|---|---|---|
| Arbor vitae (Thuja standishii) | Yes | |
| Ayan (Distemonanthus benthamianus) | Yes | |
| Blackwood, African (Dalbergia melanoxylon) | Yes | |
| Boxwood, Knysna (Gonioma kamassi) | Yes | Yes |
| Cashew (Anacardium occidentale) | Yes | |
| Cedar, Western red (Thuja plicata) | Yes | Yes |
| Cocobolo (Brya ebenus) | Yes | |
| Cocus (Brya ebenus) | Yes | |
| Dahoma (Piptadeniastrum africanum) | Yes | |
| Ebondy (Diospyros) | Yes | Yes |
| Greenheart (Ocotea rodiaei) | Yes | Yes |
| Guarea (Guarea thompsonii) | Yes | |
| Ipe [lapaccho] (Tabebuia ipe) | Yes | Yes |
| Iroko (Chlorophora excelsa) | Yes | Yes |
| Katon (Sandoricum indicum) | Yes | |
| Mahogany, African (Khaya ivorensis) | Yes | Yes |
| Mahogany, American (Swietenia macorphylla) | Yes | |
| Makore (Tieghemella hackelii) | Yes | Yes |
| Mansonia (Mansonia altissima) | Yes | Yes |
| Obeche (Triplochiton scleroxylon) | Yes | Yes |
| Opepe (Nauclea trillesii) | Yes | Yes |
| Peroba rose (Aspidosperma peroba) | Yes | Yes |
| Peroba, white (Paratecoma peroba) | Yes | Yes |
| Ramin (Gonystylus banicanus) | Yes | |
| Rosewood, Brazilian (Dalbergia nigra) | Yes | |
| Rosewood, East Indian (Dalbergia latifolia) | Yes | |
| Satinwood, Ceylon (Chloroxylon swietenia) | Yes | |
| Satinwood, West Indian (Fagara flova) | Yes | |
| Sequoia Redwood (Sequoia sempervirens) | Yes | |
| Sneezewood (Ptaeroxylon obliquum) | Yes | |
| Stavewood (Dysoxylum muelleri) | Yes | |
| Sucupira (Bowddichia nitida) | Yes | |
| Teak (Tectona grandis) | Yes | |
| Wenge (Millettia laurentii) | Yes | Yes |
Obviously, the occasional case of dermatitis won't discourage woodworkers from continuing to use exotic woods. The best path to follow is one of prevention, including dust control, protective clothing, washing and shower facilities and barrier creams, such as DuPont's Pro-Tek. Persons who suspect they are sensitive to certain woods should have a doctor do a skin-patch test to find the cause of the allergy.
Pesticides and preservatives introduced to wood while it is being harvested, processed and shipped may also cause dermatitis. These include everything from the highly toxic pentachlorophenol to the relatively innocuous polyethylene glycol (PEG) and denatured alcohol. Other chemicals often used in domestic wood processing are potassium dichromate, ethyl triethanol amine, glycol humectants, naphthenic acid, copper hydrate and zinc naphthenate. Standard threshold limit values (TLV's) based on current medical knowledge have been established for many of these chemicals, with the intention of protecting people whose jobs expose them constantly to these substances. But many chemicals banned in this country are routinely used by foreign loggers and shipping companies to prevent insect infestation, mold growth and dry rot in transit.
It is almost impossible for a woodworker to ascertain which additives have been used. Michael McCann, an industrial hygienist and chemist with the Center for Occupational Hazards in New York City, says, "The best procedure to follow is to assume that the wood being used has been processed with dangerous chemicals and rake the necessary precautions. It is also improper to remember that it is not uncommon for woodworkers to toil 12 or more hours a day for weeks on end when preparing for a show or fair, or just plain getting caught up with a work order. Under these conditions, it becomes doubtful that established TLV's for an eight-hour work day are applicable."
Dr. Bertram W. Carnow, professor of occupational and environmental medicine at the University of Illinois, points out that the key factor in determining toxic levels for an individual is what he calls "total body burden" the sum that each person's metabolism and general health will accommodate. "Liquid or solid particles such as fumes or vapors in aerosol form, cigarette smoke and other exposures in addition to those from materials used at work all contribute to the burden on the lungs, skin and other organs and should be minimized," says Dr. Carnow.
Many skin irritations are caused by contact with adhesives and solvents that dry the skin and make it more subject to infection. In addition, fumes from such chemicals often are not only toxic if inhaled or swallowed, but also highly flammable.
Epoxies, for example, can cause severe blistering and scaling. Liquid, uncured epoxy resin and hardener will cause adverse reactions in more than 40% of all workers who come in contact with it. Synthetic adhesives, such as urea- formaldehyde and phenol-formaldehyde resin, are other irritants with which woodworkers commonly come in contact. Although few woodworkers have occasion to use uncured formaldehyde or phenol resins, they should be aware that "thermal degradation" of these compounds has been reported when heat produced during high-speed machining of wood breaks down glues into separate components, or produces entirely new compounds.
Vibration disease: Another woodworking hazard, well- defined over the years by occupational health specialists, is a disease that develops and spreads slowly through the muscles and circulatory system of the fingers, hands and forearms. Vibration disease is closely related to an affliction known as Raynaud's phenomenon and is triggered by lengthy use of machinery that vibrates in the 40 to 3,000 cycle-per-second frequency range.
Most woodworkers have experienced a rhythmic tingling in the hands and arms after using such vibrating tools as orbital sanders, chain saws and pneumatic chisels. In most cases, the spasms disappear within an hour. Now, recent medical research among lumbermen in Canada has shown that serious side effects of this reaction may develop, although the process may take from several months to ten years. Smoking and cold weather tend to hasten the onset of the problem. In some cases, tendonitis of the elbow and shoulder may set in. Eventually, numbness and a heightened sensitivity to cold and humidity will occur and the fingers and palms of the hands will become extremely pale giving the condition its more common name of "white hand" or "dead fingers." In a few extreme cases, it has been necessary to amputate the fingers.
"We know that vibrations may cause definite lesions to the hands with serious potential consequences," says Dr. Gilles Laroche, a cardiovascular surgeon with the Hotel-Dieu Hospital in Quebec City, in the March 7, 1977, issue of the Canadian periodical Maclean's. "Once severe occlusive arterial disease is established, the condition is permanent and little or no improvement will result from cessation of work. In fact, the condition may worsen in a large proportion of patients."
Safety experts advise that cutting down on extensive use of vibrating tools is the best way to prevent this condition, although some authorities have urged tool manufacturers to build shock absorbers into vibrating equipment. Many chain saws now have rubber bumpers between the engine and the handles and users report them nearly vibration-free. OSHA has not set a vibration standard for tools.
Noise: High levels of noise have long been recognized by industrial safety technicians as unsafe to workers. In a typical wood shop, decibel levels often exceed industry limits and may cause hearing loss.
One study cited by NIOSH found that nearly one shop worker in four had suffered some permanent damage to hearing because of high noise levels from operating machinery. Other studies have found that excessive noise can also contribute to heart problems and gastrointestinal disorders.
Noise levels are measured in decibels (dB) on a logarithmic scale on which every increase of 10 dB means a tenfold increase in noise intensity. Ordinary conversation averages about 60 dB.
OSHA has set a maximum permissible average noise level of 90 dB per eight- hour working day. The permissible noise exposure rises to a maximum of 115 dB, a level that can be tolerated for only 15 minutes or less per day. A circular saw produces between 100 and 109 dB, a medium-sized woodworking shop in full operation averages about 110 dB and a chain saw may peak at 130 dB. One report cited by NIOSH states that "operators of saws, planers, routers, molding machines, shapers, jointers and sanders are exposed to average overall sound- pressure levels that exceed 95 dB. For several of these operations, the average may be as high as 115 dB."
Protection from noise involves damping machinery with mufflers and sound- absorbing material, keeping machines in good repair and well oiled and mounting machines on rubber bases to reduce vibration and rattling. In addition, OSHA-approved ear muffs and ear plugs rather than improvised cotton or wax devices are recommended. In general, industrial hygienists recommend ear muffs as the most effective sound reducer.
Fire hazards: Although most woodworkers are extremely cautious when using flammable materials, the danger persists. The National Fire Protection Association reports that the combination of machinery, wood, volatile fumes and finely dispersed dust in woodworking shops results in scores of fires and explosions annually. Small grains of wood dust, when scattered throughout a confined area, can explode with tremendous force if ignited by a spark or match. If flammable solvents are present, the hazard becomes much greater.
Fire prevention authorities agree that the best way to curb the possibility of fire is adequate ventilation If dust and fumes are vented by a vacuum or "cyclone" air cleaner and fresh air is continually available, most fire hazards will be sharply reduced.
Campaign begins: Although many potential hazards have been identified, a great deal remains unknown. Several state and national art and craft groups have begun a campaign to inform their members about occupational risks and to seek more government assistance in improving the health and safety of the craft community. Gail Barazani of Chicago, editor of "Hazards in the Arts" newsletter, terms these dangers a "silent enemy" that can seriously harm the health of artists, craftsmen, hobbyists and their families. A national conference is being planned for mid-l978 to bring interested persons together for a thorough discussion of the issue.
Most of the hazards that woodworkers encounter in their craft are obvious ones that will be recognized and dealt with immediately. The less obvious ones require more diligence and a determined effort to learn as much as possible about the materials being used. Dr. Waller, a craftsman himself, sums up by observing that the general rule of thumb should be "common sense and simple precautions. That will eliminate virtually all the hazards anyone is likely to experience."
Preventive Measures: Few occupational health experts would advocate giving up one's craft unless there was overwhelming evidence that a person's health was being seriously impaired, or that an irreversible allergy to materials had developed. In virtually all cases, simple modifications of the working environment and a few changes in work habits will resolve any hazards to health.
Dr. Julian A. Waller believes that "a reasonably good margin of protection " can be obtained in most shops for under $100. He and other authorities in the field suggest the following preventive measures for woodworkers:
Adequate ventilation is the basic and probably most important, requirement of a safe shop. The exhaust system should begin as close as possible to the source of dust or fumes, so they cannot accumulate and will flow rapidly away from the worker's face. The exhaust should be vented to the outside whenever possible and dust should be collected in a bag or bin. A shop vacuum with a homemade clamp that holds the nozzle near the source of dust and chips is a relatively inexpensive way to remove particles from the air. Fresh air should be allowed to enter the working area freely.
Shop cleanliness is another fundamental. A general cleanup is recommended at the end of each working day. When not in use, jars, cans and bags should be sealed and spills should be wiped up promptly. For fine sawdust and sanding dust, the best cleanup methods are wet cloths, wet mopping or industrial-type wet vacuuming. Dry sweeping or blowing with an air hose only stirs up the dust.
Personal hygiene also plays an important role. Dirty clothes, long fingernails and unwashed skin and hair can trap dust, solids and dried liquids and thus exposure continues even when the woodworker leaves the shop. Plastic disposable coveralls, gloves and hats can help reduce these hazards. Work clothes and equipment should be washed separately from other household items.
Protective equipment such as face masks, personal protective equipment, eye goggles, ear plugs or muffs and plastic or rubber gloves are essential for certain operations. Many safety devices, such as personal protective equipment and ear protectors, are rated for effectiveness by the federal government or the American National Standards Institute in New York City. A simple filter- type personal protective equipment will keep exotic dusts out of your lungs.
Recent workshops on health hazards in the arts have placed heavy responsibility on craftsmen for maintaining awareness about medical matters related to their work. Most doctors are not well informed about occupational hazards associated with the crafts and many of the cumulative diseases do not become apparent until their damage is fairly extensive. Symptoms of slow- developing occupational diseases are often attributed to another cause or dismissed as psychosomatic.
For these reasons, health authorities suggest four guidelines for woodworkers:
- Know as much as possible about the woods and other materials you use, what diseases they can cause and what the danger signs are.
- Suspect that a health problem may be related to woodworking if it improves after a layoff of a few days and gets worse when work is resumed.
- Have a physician arrange a pulmonary-function test every two or three years. This test detects lung problems much sooner than X-rays can.
- If a doctor's diagnosis or treatment does not seem satisfactory, consult specialists on particular problems. S. N. W.
[Author's note: "Clinical Toxicology of Commercial Products" by Gosslin, Hodge, Gleason and Smith is a standard medical reference text. Other sources of more information are "Health Hazards Manual for Artists" by Michael McCann, Center for Occupational Hazards, 6 Pine St., Rm.1405, New York, NY 10005, $2.75 postpaid; and "Health Hazards in Arts and Crafts" by Bertram W.Carnow,to be published in the spring of 1978 by John Wiley & Sons. 605 3rd Ave., New York, NY 10016.]
(Reprinted from the Winter, 1977 issue #9, "Fine Woodworking" by the Taunton Press, Inc., 63 South Main St., Newtown, CT 06470 - Not for Resale).
Operating Instructions
BRETT-GUARD - Table Saw Safety Tool
The use of the BRETT-GUARD Table Saw Safety Tool (Guard) is basically quite simple. But, due to the serious nature of operating a table saw, there are many factors to be considered. The following pages show most of the important factors to consider for safe table saw operation. It must be pointed out that some operations are done more safely with other equipment.
WARNING: NEVER MAKE ANY ADJUSTMENTS WHILE BLADE IS ROTATING.
LOCKING GUARD INTO POSITION (Down & Locked)
- Swing the Saw Guard Housing Assembly into place. While swinging lift up on the Locking Knob and gently lower the assembly on to the Mounting Bracket.
NOTE: Never let the assembly drop. - Rotate the Locking Knob #2 until the Locking Rod drops into the Key Hole. At this point the Housing should be seated on the Mounting Cradle.
- Rotate the Locking Knob clockwise. A mechanical stop is reached after 1/2 revolution. The Guard is now in the Down & Locked Position.
NOTE: You should notice some resistance when rotating the Locking Knob in Step 3. If not, it should be adjusted otherwise it could vibrate loose. Refer to Maintenance Instructions.
UNLOCKING GUARD & SWINGING AWAY
- Make certain that the power is off to the machine.
- Rotate the Locking Knob #2 counter-clockwise and lift.
- Gently swing the Guard Assembly up until it rest on the Stops.
WARNING: Never leave the blade unguarded.
PROCEDURE TO CHANGE/ACCESS SAW BLADE
- Disconnect power to the machine. Observe OSHA Lockout Procedures.
- Follow the Unlocking Instructions above.
- When saw blade service is completed follow the Locking Procedure above.
- Restore power.
ANTI - KICKBACK ADJUSTMENT
The anti-kickback mechanism is an integral part of the Safety Shield and the Anti-Kickback Adjustment Knob #5 is located on the top of it. The Anti- Kickback fingers are spring loaded. The Knob provides an adjustment range from Retracted to Full Pressure. It is recommended for most table saw set-ups that the Anti-Kickback mechanism be engaged.
WARNING: The Safety Shield must be in contact with the workpiece and the Anti-Kickback Adj. Knob adjusted for the Anti-Kickback Mechanism to work.
INTERLOCK CONTROL Optional
Refer to page 13 for full details on the function of this valuable option.
WARNING: For the best protection against unauthorized use, never leave the control key in the switch unattended.
* Early models were equipped with threaded Locking Rods and required several revolutions of the Locking Knob to lock securely.
SAFETY SHIELD ADJUSTMENTS
Vertical
The height of the Safety Shield is very important. The Vertical Adjustment Crank Handle #1 is used to raise and lower the shield.
WARNING: For the Anti-Kickback device to function and/or the Shield to serve as a hold-down device it is imperative that the shield be adjusted so that the lower edge of the shield applies a light pressure to the top of the work piece.
Fine Horizontal Adjustment
- With the guard in the Down & Locked position, loosen the two (2) Horizontal Shield Adj. Lock Knobs #4.
- Position the shield (left to right) as required. The recommended position is for the Anti-Kickback Fingers to be centered over the line of the blade. When that is not practical refer to Typical Set-Ups.
- Now retighten the Lock Knobs.
Coarse Horizontal Adjustment
The procedure to make major horizontal adjustments are as follows:
- Loosen the telescoping Arm Lock Knob #6 (Set Screw) - refer to page 5 for location.
- Lift up slightly on the front of the Guard Housing Assembly and move to the desired position.
- Then retighten the Lock Knob (Set Screw).
WARNING: This adjustment should only be done by authorized personnel.
IMPORTANT NOTICE: For educational and other applications it is recommended that horizontal adjustment be restricted to always keep the blade covered by the Safety Shield. This can be accomplished by properly positioning the Telescoping Arm and the #9 Stop Collar mounted on the 1/2" dia. rod of the Shield Support Bracket. It is further suggested to substitute the #6 Lock Knob with a Set Screw to help insure that adjustments made to the Telescoping Arm are only done with proper supervision.
Leveling
The Safety Shield must be kept parallel with the top of the saw table or the Anti-Kickback feature of the guard will not function correctly. This detail is very important and should be checked regularly.
A series of Set Screws and Cap Screws (as shown) are used to level the shield both front to back and side to side.
Squaring
The edge of the Safety Shield is to be kept parallel to the saw fence. To adjust:
- Loosen the two (2) mounting screws that secure the Safety Shield to the Shield Support Bracket.
- Lock the saw fence up against the side of the shield. Then retighten the two (2) mounting screws.
CAUTION: The saw table and fence must first be squared to the saw blade.
It must be pointed out that some operations can be accomplished more safely with other tools i.e.: router, shaper, etc. (albeit properly guarded). The operator and the instructor/supervisor must make a responsible decision as to whether the set-up being made is safe.
WARNING: Always turn off the saw motor as soon as the cut is completed.
IMAGES
CROSS-CUTTING
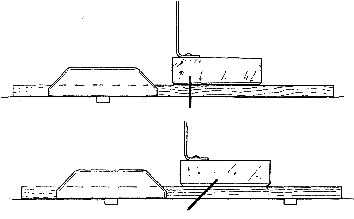
DADOING
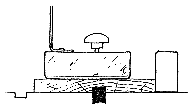
RIPPING
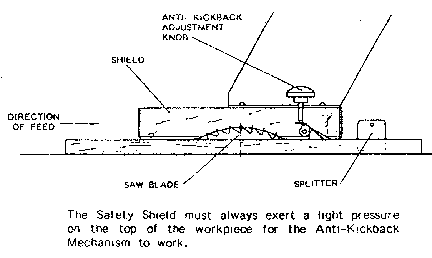
WARNINGS: When ripping -
- always have the splitter installed properly.
- always engage the Anti-Kickback fingers.
- always stand to the side of saw blade.
- long stock, always use out-feed support.
- narrow stock, always use a push stick.
- always keep the work piece firmly in control until the saw blade is stopped rotating.
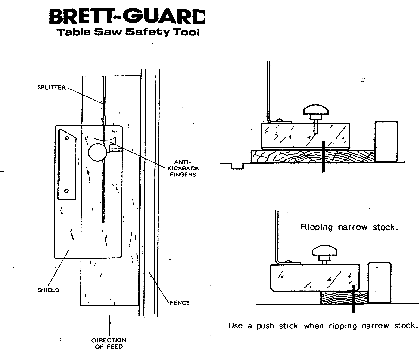
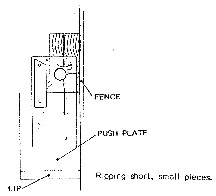
When ripping short pieces it is important to use a push plate (as shown) so that both pieces are pushed past the edge of the saw blade. The Push Plate should be of similar thickness to the workpiece and be outfitted with a lip on the front to prevent it from going to far under the shield and getting caught under the Anti-Kickback fingers.
Typical Set-ups
TENONING
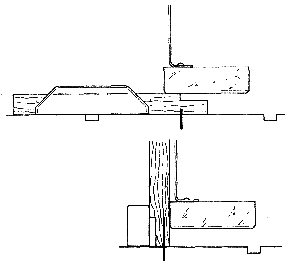
RABBETING
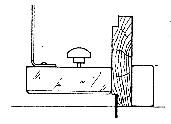
COMPONENT DESCRIPTION
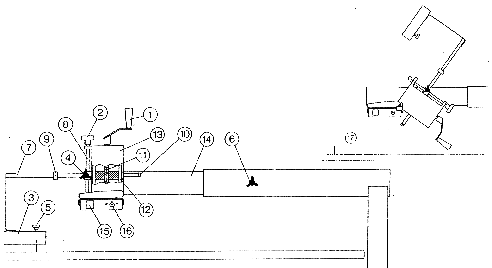
COMPONENTS:
VERTICAL ADJUSTMENT CRANK HANDLE The handle on top of the saw guard housing raises & lowers the transparent safety shield assembly to fit the height of the work piece.
LOCKING KNOB The hand knob located on top of the saw guard housing, next to the Vertical Adjustment Crank Handle, is used to lock the saw guard housing assembly in the Down & Locked Position and to release it.
TRANSPARENT SAFETY SHIELD An inverted box type guard that permits the saw blade and work piece to be seen. Must always be in contact with the work piece. The Anti-Kickback mechanism is an integral part of the shield.
HORIZONTAL SHIELD ADJUSTMENT LOCK KNOBS Hand knobs located on the front and rear of the saw guard housing lock the 1/2" dia. horizontal bars in position.
ANTI-KICKBACK ADJUSTMENT KNOB Raise & lowers the Anti-Kickback device located in the safety shield.
TELESCOPING ARM LOCK KNOB (or Set Screw) Used to lock the telescoping over arm assembly in position to suit the operation being performed. The hand knob can be replaced with d set screw to help limit unauthorized horizontal guard adjustment.
SHIELD SUPPORT BRACKET Connects the Safety Shield to the adjustment mechanism.
LOCKING ROD Locks the Safely too! in the Down & Locked Position. Is rotated by the Locking Knob. (For units equipped with the optional Interlock Control, the 'dog' on the bottom end of the rod is the actuator that trips the limit switch.)
*Lubricate these components regularly
HORIZONTAL ADJUSTMENT STOP COLLAR (Optional) Limits the travel of the 1/2" dia. horizontal bars. Used in conjunction with item No. 10 and a Set Screw for Item No. 6 to help ensure that the shield is always over the saw blade.
HORIZONTAL ADJUSTMENT STOP BOLT Limits the travel of the 1/2" dia. horizontal bars. Helps discourages removal of the safety shield and mounting bracket assembly by unauthorized personnel.
VERTICAL ADJUSTMENT SCREW * Provides positive control for the raising & lowering of the Safety Shield Assembly. It is operated by the Vertical Adjustment Crank Handle. Lubricate frequently for smooth operation and extended life.
VERTICAL GUIDE BARS * Serves to keep the Safety Shield stable. When the Safety Shield begins to get loose and sag these must be replaced along with their companion bushings.
HOUSING The complete raising, lowering, locking & adjustment mechanism.
TELESCOPING ARM For coarse horizontal Safety Shield adjustments.
AUXILIARY STOP BUTTON (Optional) Conveniently located red stop button, for simpler and safer saw motor shut offs.
3-POSITION KEY SWITCH (Optional) Refer to the Interlock Control Instructions.
SPLITTER Mounts to the saw blade trunnion and must be directly in line with the saw blade. It serves to keep the kerf of the work piece from "closing up" on or pinching the saw blade. This must be in place during all cutting operations where the saw blade is cutting all the way through the work piece.